
Recipes for Energizing Your Team Celebrations!

Who doesn’t love to celebrate?! And it’s an important step for our teams and groups as well. I want share with you three meaningful “games” for three different scenarios. These activities are related to celebrating an aspect of the team or organization. I will include the learning theory behind the game, the process for delivering it effectively and the tools and support you need to get organized to deliver it. Each game can be modified, so like a recipe, I’m going to give you some alternate “ingredients” for each game depending on your situation. This blog is for both process facilitators and trainers.
I’ve chosen three games/activities based on the following criteria:
- 1. They work because I’ve either delivered them or participated in a similar experience.
- 2. They can be used in a multitude of settings if adapted appropriately and take into account disabilities and other barriers to participation.
- 3. Every facilitated session and training has an opening for this “game”.
- 4. Both novice and experienced trainers/facilitators can likely deliver them with success.
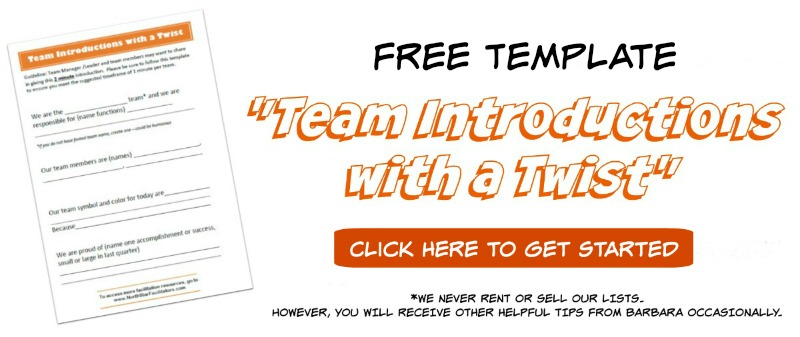
Game 1: Team Introductions with a Twist
The goal: Creating an opening or safe space for different departments or teams to show pride and success.
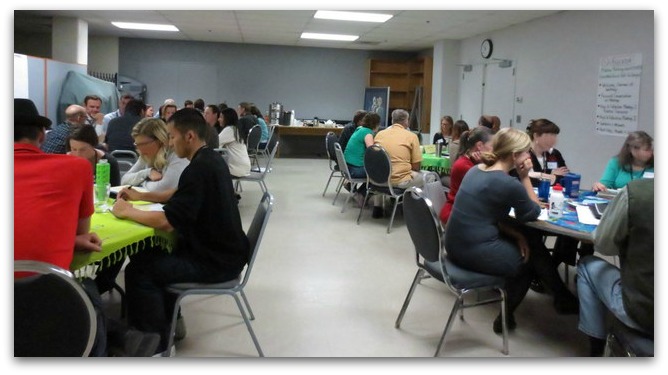
The scenario: You have a group likely larger than 10-15 people. There are subunits within the group, ideally no more than 5-10. One of the goals of the meetings is to have the group learn what has been happening within the larger organization or department. Potentially there have been misunderstandings between the subunits or some rivalry you want to openly address and “release” into something more positive.
The instructions:
- Name the “elephant in the room”, e.g. “I’ve heard that there may sometimes be rivalry or competition amongst your units. Although sometimes that can be helpful if you are working to a deadline, most of the time it can impede the greater goal of the department organization. We’d like to just remind you that you all are extremely important parts of the whole and we’d like to have each of you share a little bit about your team’s responsibilities and accomplishments.”
- Divide the whole group up by unit so that each team or subunit is sitting at a different table. If some units are very small, i.e. 1-2 people, try to have them join the most compatible unit.
- On your tables have the “Team Introductions with a Twist” templates. Ask them to fill out in less than 5-10 minutes.
- Ask each team to come to the front of the room and proudly share what they have written on their templates. Ask for a round of applause. After all the presentations, debrief with following questions:
- o What team names stood out for you?
- o What was one thing you learned that you did not know?
- o What else would you like to know from any team?
- o Where do you see some opportunities for collaboration?
- o What is the most important thing we can do to support all the teams here?
The needed tools and props:
- Team template (download below)
- Separate spaces and tables for each team to meet and think about what they can share
- Scrap paper and writing pens
- Instructions on timing , etc on a PowerPoint slide or flipchart
Recipe substitutions:
- If there is a serious conflict between teams, you might need to have a longer conversation at the beginning and the end of the session. Prepare some questions to do that.
- You could ask each team to write down their template answers on a flipchart size paper so people can see as well as hear.
- You could add an extra task and have them draw a logo or banner for their team name.
Be sure to:
- Set the stage for why you are doing this.
- Keep it fast paced if it’s meant to just be an introduction. But slower paced if you want to give each team and the whole group time to wrestle with the dysfunctional dynamics that have been taking place.
Game 2: Toss a Message of Hope
The goal: Inspire a group at the end of a visioning, goal setting or strategic planning session.
The scenario: You have just helped a group through a visioning or mission process. You want them to integrate what they’ve created together.
The instructions:
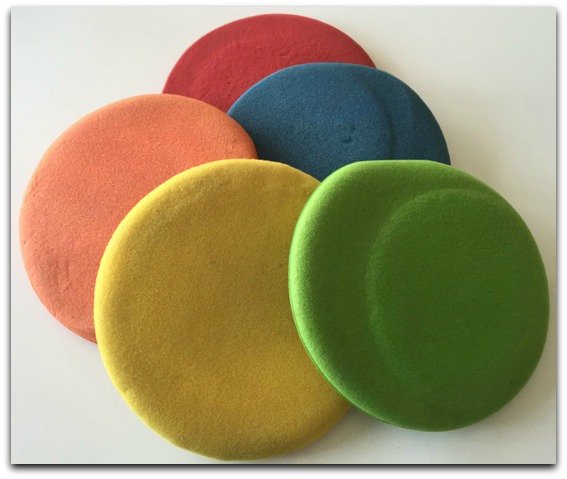
- Each participant writes a positive message of hope for the organization’s future on Frisbees.
- They each launch frisbees for their realization.
- At the end of the day, each participant gets to take a messaged frisbee home.
The needed tools and props:
- Foam frisbee discs, 1 per person
- Permanent markers in a variety of dark colors
Recipe substitutions:
- Use another type of toy other than foam frisbees, like the buttons idea in Game 3.
- Use it at the end of a difficult conversation and the participants write a message of hope to other members.
Be sure to:
- Use props that work. We use foam disks (Frisbees) that you can purchase online.
Game 3: Team Commitment Poster
The goal: Fostering commitment to a project, task or goal.
The scenario: The group has been working on strategic planning, goal setting or a project action plan. You need to ensure there is a fun, celebratory way for them to show their tangible commitment to ensuring team or project success.
The instructions:
-
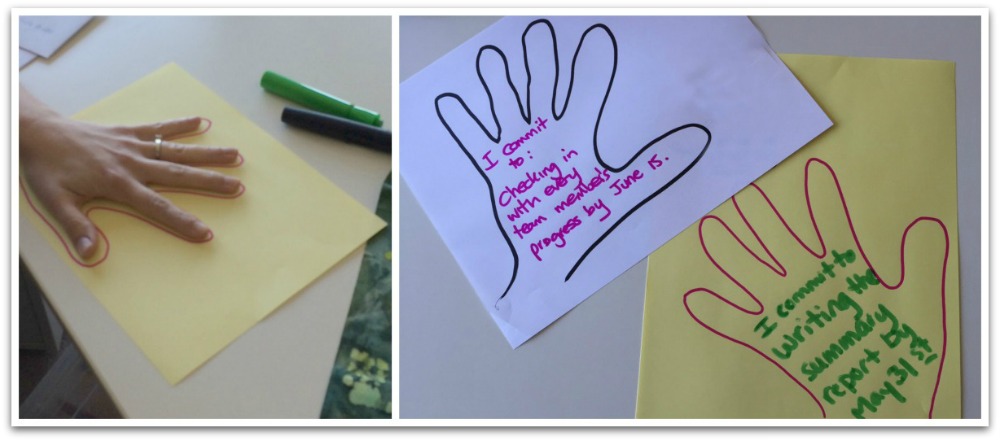
- Prior to the activity, post a long blank sheet of large paper on a easily accessible wall.
- Tell the group you’re going to ask them to do a creative closing commitment activity.
- Tell them to look over the work of the day, the goals and/or action plans and brainstorm 1-3 things they can easily commit to help the project run smoothly.
- Post the instructions on a flipchart or PowerPoint slide as follows:
-
- 1. Decide which commitment statement you will share with the whole group.
-
- 2. Take a marker color of your choice up to the large posted paper*.
-
- 3. Place one hand on a spot where there is no other persons hand print.
-
- 4. Draw the outline of the hand with the marker.
-
- 5. Write an inspiring message to your team members, or write down your specific commitment to the project or team. Put your name underneath the handprint.
-
- *for those with mobility challenges, ensure there is a pair of scissors and markers colored on white paper accessible to them, e.g. on their table. Ask them to draw their hand on the smaller piece of paper, cut it out (or have someone do it for them), put their commitment words inside the hand drawing and give to someone else to post for them. Make sure you have some kind of tape at the wall to post the hands. Alternately you can have everyone do their hands this way so that no one is singled out.
- If time permits, have a group member read out all or a few of the commitments (depending on time available). Ask for a round of applause from the whole group.
The needed tools and props:
- 3 ft wide x 9-12 ft long (1 x 3-4 meters) paper (make it as long as needed to accommodate all group members)
- Painters tape
- Masking tape to affix the cutout hands from those with mobility challenges.
- 1 dark markers per person in multiple colors (no oranges or reds as these do not show up well for people with some visual disabilities)
- Scissors
- Regular sized paper, white and colored
- Phone or camera to take photo
Recipe substitutions:
- You can do this activity for a group that needs positive reinforcement. Instead of writing an individual commitment, they can write a word of appreciation to their team members or a slogan of encouragement.
- Make adaptations for people with disabilities as noted in the instructions above.
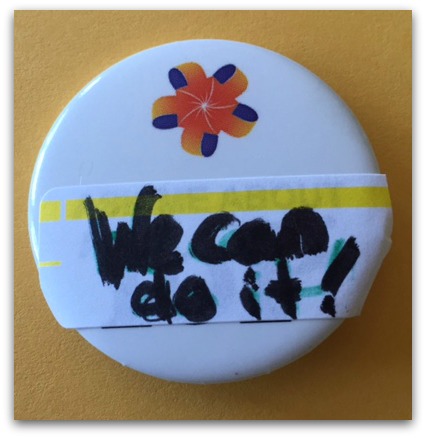
- See Game 1 and have people write a message of hope or words of encouragement on pin-on buttons. After everyone has written their message and tossed their message in a basket, mix them up and have everyone take one home with them.
Be sure to:
- Make time for this.
- Be clear in your instructions both verbally and visually.
- Have your white larger paper posted in an area that will allow many people to be working on it at one time.
- Type up these commitments and/or take a photograph of the commitment poster to include in the meeting notes.

THESE TOOLS SEEM USEFUL, KINDLY SHARE